Hi,
Recently one of my clients asked me to prepare his old PCs with Windows XP operating system for use with the terminal services. For the users the whole process, of connecting to the Terminal Services Server, had to be as simple and seamless as possible.
The final result that I achieved was following: Users were turning on their PC’s and after booting they saw a Terminal Session Screen with a prompt to enter their username and password, just like on the picture below:
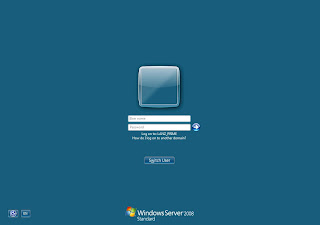
I think simpler is impossible :-)
Now let me explain you in details how I achieved this, to be frank this whole operation consists of several very simple steps and most of you already know how to do this. But all together these steps give an interesting result.
Here are the main steps:
1) Make Windows XP log on automatically.
2) Make Remote Desktop Session to run automatically once Windows XP loaded.
3) Disable Windows Explorer Shell.
Now let’s walk through the steps in details. Before you begin, I always recommend making a backup of important data and creating a system restore point, just in case :-)
Step 1. Make Windows XP to log on automatically.
1) First of all you have to create a dummy user that will be used in order to log on to XP, it can be either domain or local user.
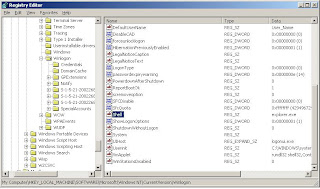
2) Now open Registry Editor (regedit)and navigate to:
HKEY_LOCAL_MACHINE\SOFTWARE\Microsoft\WindowsNT\CurrentVersion\Winlogon key
find the following keys:
• DefaultUserName
• DefaultDomainName
• AutoAdminLogon
• DefaultPassword
You may not have all of the keys, most probably there will not be DefaultPassword and AutoAdminLogon, so we have to create these keys. In order to create a new key right click on the empty area and select New > String Value (see picture)
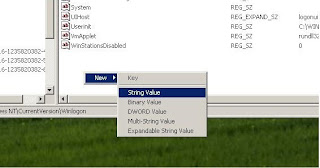
In the name box which now says New Value #1 type the string name that we need, for example DefaultPassword.
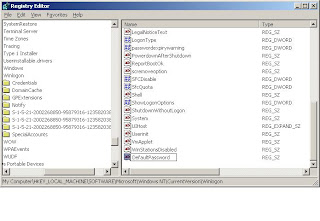
Once we have all required Strings we can change the values. We have to insert the following values:
• DefaultUserName – Exact “user name” of your dummy user that we created earlier
• DefaultDomainName – Here we have to enter “Domain name”, if you are not using the Domain topology you have to provide a “Computer Name” of this PC.
• AutoAdminLogon – this String has to be set to “1”, it means that auto logon is allowed.
• DefaultPassword - Password for the dummy user.
Here is an example:
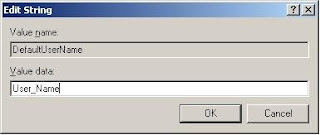
In my case I have created a user with the following details:
- User name: User_name
- Password: password
- My Domain’s name: Domain_Name
Now you can have a look at the picture below to see how I set it up in my Registry.
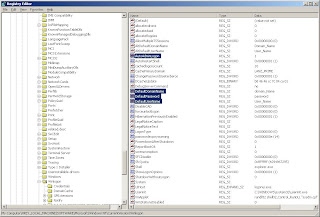
Once you made all the changes in the Registry, just close it.
The first step is done, this will allow the PC to logon automatically, now you can restart your PC and if you did everything correctly the PC should boot up and log on without your interaction. If you ever decide to log on using another user account, hold down the shift key as you log off. Or you can set the value of "AutoAdminLogon" key, back to 0.
Step2. Make Remote Desktop Connection to run automatically once Windows XP is loaded.
1) Create a Remote Desktop Connection file and enter all the required information. To do this follow these steps:
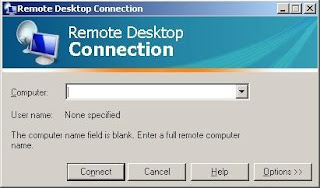
- Click on Start > Run > type mstsc and press Ok, you should see Remote Desktop Connection window.
- Click on Options and provide name or ip address of your TS Server, also you can go through all tabs and assign preferred settings.
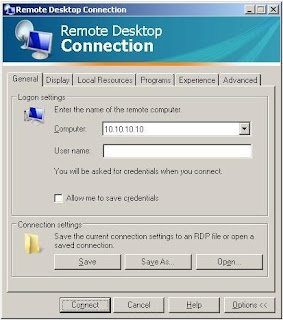
- Once we have entered the TS Server name or address and finished with all other settings we have to save this file, to do so click on Save As and specify a location for this file (I usually put it on a shared folder so I it would be accessible from any other PC that I will be setting up in the future)
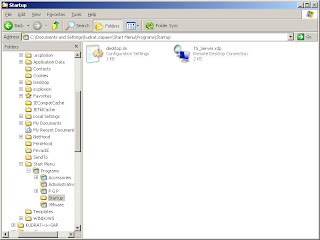
- Now when we have the *.rdp file (the file that we have just saved) we have to add it into the Startup. To do this, right click on the Start button and choose Explore, it should open the Start Menu folder navigate to Documents and Settings\user_name\Start Menu\Programs\Startup, copy your *.rdp file into that folder.
The second step is done. What we did, we created a Remote Desktop Connection file (which has .rdp extension) and added it into Startup so that Remote Desktop Connection is started automatically without user’s interaction.
Step 3. Disable Windows Explorer Shell.
This step is optional, because you do not really have to disable the Windows Explorer shell to get the final result. I prefer disabling it to eliminate any possible interaction of the users with the local systems. The less users can do on the local machine, the less is chance that they will brake anything :-)
To disable Explorer shell do the following:
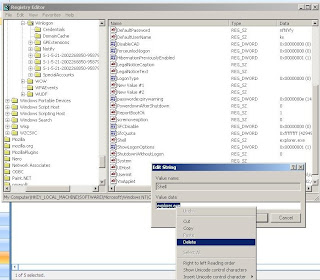
in HKEY_LOCAL_MACHINE\Software\Microsoft\Windows NT\CurrentVersion\Winlogon find the "shell" Key and remove explorer.exe Value from this Key.
The step 3 is done. Now, if we reboot the PC it will not start the Shell, i.e. there will not be any shortcuts or buttons, only the background of your Desktop.
One more thing to add, if your users turn off PCs in the evenings you may want to give them the option to Shut Down the PC. As we disabled the Shell the users will not have any buttons so cannot click on Start > Shut Down. What I do in this case, I set up the PC to power off from pressing the Power button on the PC case. To do this you have to go to the Control Panel > Power Option > in the Advanced tab set behaviour for the Power Buttons to Shut Down.
Here we go, everything is done. Now when we power on the PC it should start, logon automatically and bring you TS logon screen. If the user closes TS logon screen he can do nothing to the PC, unless he is more or less IT literate and can call the Task Manager and just start explorer.exe, but there are loads of ways to stop him from running task manager and/or explorer.exe :-) if you want to do this.
As I said, all the steps are quite easy and familiar, but together they give us an interesting outcome. If Microsoft could collect all these steps into one installation package and add some additional features, it would be a quite interesting product.
If some steps are not clear, or you have any questions, feel free asking me.
Thank you!
Kudrat
Recently one of my clients asked me to prepare his old PCs with Windows XP operating system for use with the terminal services. For the users the whole process, of connecting to the Terminal Services Server, had to be as simple and seamless as possible.
The final result that I achieved was following: Users were turning on their PC’s and after booting they saw a Terminal Session Screen with a prompt to enter their username and password, just like on the picture below:

I think simpler is impossible :-)
Now let me explain you in details how I achieved this, to be frank this whole operation consists of several very simple steps and most of you already know how to do this. But all together these steps give an interesting result.
Here are the main steps:
1) Make Windows XP log on automatically.
2) Make Remote Desktop Session to run automatically once Windows XP loaded.
3) Disable Windows Explorer Shell.
Now let’s walk through the steps in details. Before you begin, I always recommend making a backup of important data and creating a system restore point, just in case :-)
Step 1. Make Windows XP to log on automatically.
1) First of all you have to create a dummy user that will be used in order to log on to XP, it can be either domain or local user.
2) Now open Registry Editor (regedit)and navigate to:
HKEY_LOCAL_MACHINE\SOFTWARE\Microsoft\WindowsNT\CurrentVersion\Winlogon key
find the following keys:
• DefaultUserName
• DefaultDomainName
• AutoAdminLogon
• DefaultPassword
You may not have all of the keys, most probably there will not be DefaultPassword and AutoAdminLogon, so we have to create these keys. In order to create a new key right click on the empty area and select New > String Value (see picture)

In the name box which now says New Value #1 type the string name that we need, for example DefaultPassword.

Once we have all required Strings we can change the values. We have to insert the following values:
• DefaultUserName – Exact “user name” of your dummy user that we created earlier
• DefaultDomainName – Here we have to enter “Domain name”, if you are not using the Domain topology you have to provide a “Computer Name” of this PC.
• AutoAdminLogon – this String has to be set to “1”, it means that auto logon is allowed.
• DefaultPassword - Password for the dummy user.
Here is an example:

In my case I have created a user with the following details:
- User name: User_name
- Password: password
- My Domain’s name: Domain_Name
Now you can have a look at the picture below to see how I set it up in my Registry.

Once you made all the changes in the Registry, just close it.
The first step is done, this will allow the PC to logon automatically, now you can restart your PC and if you did everything correctly the PC should boot up and log on without your interaction. If you ever decide to log on using another user account, hold down the shift key as you log off. Or you can set the value of "AutoAdminLogon" key, back to 0.
Step2. Make Remote Desktop Connection to run automatically once Windows XP is loaded.
1) Create a Remote Desktop Connection file and enter all the required information. To do this follow these steps:
- Click on Start > Run > type mstsc and press Ok, you should see Remote Desktop Connection window.

- Click on Options and provide name or ip address of your TS Server, also you can go through all tabs and assign preferred settings.

- Once we have entered the TS Server name or address and finished with all other settings we have to save this file, to do so click on Save As and specify a location for this file (I usually put it on a shared folder so I it would be accessible from any other PC that I will be setting up in the future)
- Now when we have the *.rdp file (the file that we have just saved) we have to add it into the Startup. To do this, right click on the Start button and choose Explore, it should open the Start Menu folder navigate to Documents and Settings\user_name\Start Menu\Programs\Startup, copy your *.rdp file into that folder.

The second step is done. What we did, we created a Remote Desktop Connection file (which has .rdp extension) and added it into Startup so that Remote Desktop Connection is started automatically without user’s interaction.
Step 3. Disable Windows Explorer Shell.
This step is optional, because you do not really have to disable the Windows Explorer shell to get the final result. I prefer disabling it to eliminate any possible interaction of the users with the local systems. The less users can do on the local machine, the less is chance that they will brake anything :-)
To disable Explorer shell do the following:
in HKEY_LOCAL_MACHINE\Software\Microsoft\Windows NT\CurrentVersion\Winlogon find the "shell" Key and remove explorer.exe Value from this Key.


The step 3 is done. Now, if we reboot the PC it will not start the Shell, i.e. there will not be any shortcuts or buttons, only the background of your Desktop.
One more thing to add, if your users turn off PCs in the evenings you may want to give them the option to Shut Down the PC. As we disabled the Shell the users will not have any buttons so cannot click on Start > Shut Down. What I do in this case, I set up the PC to power off from pressing the Power button on the PC case. To do this you have to go to the Control Panel > Power Option > in the Advanced tab set behaviour for the Power Buttons to Shut Down.
Here we go, everything is done. Now when we power on the PC it should start, logon automatically and bring you TS logon screen. If the user closes TS logon screen he can do nothing to the PC, unless he is more or less IT literate and can call the Task Manager and just start explorer.exe, but there are loads of ways to stop him from running task manager and/or explorer.exe :-) if you want to do this.
As I said, all the steps are quite easy and familiar, but together they give us an interesting outcome. If Microsoft could collect all these steps into one installation package and add some additional features, it would be a quite interesting product.
If some steps are not clear, or you have any questions, feel free asking me.
Thank you!
Kudrat
hi, is there any possibility to change step 3 in order to disallow user from closing the Remote desktop console, I saw the way is witch user can close the console, but it starts all over again, so i think this is better way
ReplyDeleteHi,
ReplyDeleteThat would be a really good thing to do, but I am afrasid it is not possible, at least not with the standard Windows features.
Thanks,
Kudrat
This excellent website definitely has all the info I wanted concerning
ReplyDeletethis subject and didn't know who to ask.
Feel free to surf to my web blog: