Friday, 12 March 2010

Error: Your computer’s settings do not allow connection to this remote computer

Hi,

Just want to share some information which might be useful for some of you.

I was playing with a Terminal Services Server (Windows 2008) in a test environment; in particular I was trying different things with TS Web Access and RemoteApps. I have published MS Outlook as a Remote Application available through the TS Web Access, but every time when I was trying to access MS Outlook from the TS Webb Access page (from Windows XP SP3 client PC) I was getting an error:

Your computer’s settings do not allow connection to this remote computer because it cannot be identified. Either it is running a version of Windows that is either earlier than Windows Vista, or it is not configured to support server authentication.

For assistance, contact your network administrator or the owner of the remote computer.


Having checked all setting I found out that the Security Layer for Server authentication and data encryption was set to RDP Security Layer. I have changed the Security Layer to Negotiate and the problem has disappeared.


So, if you will be getting the same error you can check this setting and change it if necessary.

Thanks,

Kudrat

Thursday, 4 March 2010

Customizing TS Web Access

Hi,

Recently I have seen several questions on the Microsoft Forums regarding customizing TS Web Access page. One of the things that people want to know is how to hardcode Terminal Services Server’s IP address into the “Connect to:” field on the TS Web Access page. Another question is how to set the default Remote Desktop Size on the TS Web Access page.

How to hardcode Terminal Server’s IP address on the TS Web Access Page.


1) Open the IIS console on the server hosting your TS Web Access and navigate to the TS website. Inside the website right click on the folder with your language pack (in my case it is en-US) and go to Explore.


2) Right click on the Desktops.aspx and choose Edit.


3) Let us assume the IP address of your Terminal Services Server is 192.168.100.87
In the Desktops.aspx find this line:


4) Now add this text to the end of that line: value="192.168.100.87" (change the IP address to the one you require)

Your line should look like this:


5) Now just save the changes and try to open your TS Web Access page, you should see the IP address of your server already entered into the “Connect to:” field


How to set default preferred “Remote Desktop Size” on the TS Web Access Page.


By default TS Web Access page has “Full Screen” as a Remote Desktop Size. Administrators may want to change this to some different setting. If you want to do this follow these steps:

1) In the Desktops.aspx (see above how to find this file) find this part of the code:


2) Let us assume that you want to set 1024x768 as your default setting, in this case you have to delete attribute selected from the line containing FullScreen and add it to the line containing 1024x768

Your code should look like this:


3)Now just save Desktops.aspx file and check your TS Web Access page. It should look like this


If you liked the post, please feel free to click on a few Ads on this page ;-)

Wednesday, 10 February 2010

Filtering Group Policy from applying (Windows Server 2008)

Hi,

In this post I would like to refresh my previous post about filtering group policy from applying. The first post was showing the steps based on Windows Server 2003, now I want the show the same thing but for Windows Server 2008. If you want to know what filtering is used for, please have a look at my previous article. Here I will be showing the particular steps without a lot of explanations.

1) Open your Group Policy Management Console.


2) In the GPMC navigate to the GPO which needs to be filtered out, right click on it and choose Edit.


3) In the Group Policy Management Editor right click on the name of the GPO on top and go to the Properties.


4) In the properties window go to the Security tab, add required user and set Deny on Apply group policy for this user.


That is it, you have just filtered your Group Policy from applying to a particular user.

Thanks for reading.

Kudrat

Thursday, 4 February 2010

Terminal Services Licensing Servers.

Hi,

Today I want to share with you some “easy to understand” pictures about Terminal Services Licensing. In particular I will show you which version of Terminal Services Licensing Server can issue licenses to which version of Terminal Services Server.


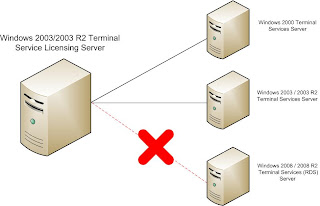
Terminal Services Licensing Server based on Windows Server 2003/2003 R2 operating systems.


As you can see on the picture, this server can issue licenses to the Terminal Services Server based on Windows Server 2000/2003/2003R2 operating systems. But it cannot hold and issue licenses for the Terminal Services (RDS) Servers based on Windows Server 2008/2008R2.

For example you have a Terminal Services Server based on Windows Server 2003/2003R2 and you are planning to upgrade it to Windows Server 2008/2008R2. In this case you will have to upgrade your Terminal Services Licensing Server from Windows Server 2003/2003R2 to Windows Server 2008/2008R2 and you will also have to upgrade your TS CALs (Terminal Services Client Access Licenses) from 2003 to 2008.


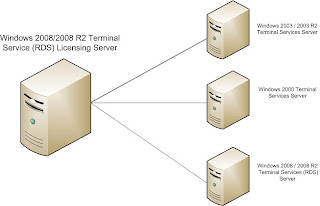
Terminal Services (RDS) Licensing Server based on Windows Server 2008/2008 R2 operating systems.


On this picture we can see that Terminal Services (RDS) Licensing Server based on Windows 2008/2008 R2 operating system can hold and issue licenses to the Terminal Services (RDS) Servers running on Windows Server 2000/2003/2003R2/2008/2008R2 operating systems. It is quite straightforward, younger operating systems support the older ones.

I would like to draw your attention to one point as sometimes it confuses some people. Terminal Services (RDS) Licensing Server based on Windows Server 2008 can issue licenses to the Terminal Services (RDS) Server running on Windows Server 2008R2, and vice-versa Terminal Services Licensing (RDS) Server based on Windows Server 2008R2 operating system can issue licenses to the Terminal Services (RDS) Server running on Windows Server 2008.

That is it, I hope it gave you a clear idea about interaction between TS licensing Servers and TS Services Servers.


Tuesday, 12 January 2010

Installing Terminal Services Server, the main things you need to know.

Hi,

Recently I have met a lot of questions about implementing Terminal Services in the organizations. In most of the cases people know the main steps and procedures, but at the same time loads of small things are missing, which lead to the wrong configuration and different problems.

I want to summarize all the steps and create a basic guide for beginners about the Terminal services. Let us call it “My First Terminal Services Server”. I will not be speaking about each setting in details, instead of that I will provide the main steps and the articles which will help you to understand them. As an example I will be speaking about Microsoft Windows 2008 operating system and its Terminal Services role (the main steps are pretty much the same for operating systems starting from Windows Server 2003 to Windows Server 2008 R2). Let us assume you have already planned everything and you already have a clear idea about things you want. So, let start with the installation.

1. Installing TS role. First of all you have to install the Terminal Service role on your Windows Server 2008 machine. It is not a complex task and there are a lot of different guides on the internet. Here is an example of such guide, it is part of the bigger article, but the first part covers installing Terminal Service role.

2. Licensing. The second thing you would want to do is to deal with the licensing. The article that I brought above covers installing the Licensing Server and adding the Terminal Services licenses. I just want to remind you that by default Windows 2008 allows 2 concurrent RDP connections at the same time, if you want more you have to buy licenses and activate them on your Terminal Services Licensing Server. Here is a good article about TS licensing by Microsoft.

3. Applying Group Policy Settings. You will probably want to apply specific Group Policy Settings to the users who logs in to the Terminal Service Server, which are different from the other Group Policy Settings, applied in your organization. Let us go through this step by step, as this bit usually confuses a lot of beginning administrators. Here is what you have to do

- Create an OU (Organizational Unit) called Terminal OU (the name can be different)

- Move your Terminal Services server Computer Object to the Terminal OU.

- Create a GPO (Group Policy Object) called Terminal GPO (the name can be different) and link this GPO to the Terminal OU.

- Open Terminal GPO, navigate to: Computer Configuration > Policies > Admin Templates > System > Group Policy and change the following setting: User Group Policy loopback processing mode. If you are not familiar with this setting, please refer to this article. In addition you can have a look at this article by Microsoft.

4. Filter GPO from applying. As an administrator you probably do not want to be limited just like a standard user, so you have to filter the GPO from applying to your account. Please have a look at this article to learn how to perform this step.

5. Allow logon through Terminal Services. Now you have to allow your users to log on to your Terminal Service server. To do this perform the following steps:

- Open the Terminal GPO which we have just created.

- Navigate to Computer Configuration > Policies > Windows Settings > Security Settings > Local Policies > User Rights Assignment and find the setting called “Allow logon through Terminal Services”.

- Enable this setting and choose the group which will be given this right. For example you can create a group and call it Terminal Services User.

- Add users who will be logging to the Terminal Services server to the Terminal Services User group.


Please keep in mind, after we have made changes to the GPO, it has to be applied to the Terminal Service server, you can do this by restarting the server or by issuing gpupdate /force command on the server.

6. Configuring User Settings. The next step is configuring your users for Terminal Services environment. There are few main things that you will have to consider so let us speak about them separately:

a) User Profiles. You can specify profile path for the Terminal Session, i.e. the profile which will be loaded only when the user is logged to the Terminal Services Server over Remote Desktop Connection. Please do not confuse this profile with the Roaming Profile, Terminal Services Profile is loaded only during the terminal session, whereas Roaming Profile is loaded everywhere. For example if you have the Roaming Profile enabled and the Terminal Services Profile enabled. Every time you logon to the Terminal server the Terminal Services Profile will be loaded, but if you logon to a PC interactively (i.e. not through RDP), the Roaming Profile will be loaded.

We can specify the Terminal Service Profile in two ways:

- You can specify profile path in the properties of the User Account, in the tab called “Terminal Services Profile”, “Profile Path” field.

- You can specify this path using a group policy: Open the Group Policy which you created for your Terminal Services server and navigate to: Computer Configuration > Policies > Administrative Templates > Windows Components > Terminal Services > Terminal Server > Profiles, here can specify the Mandatory or Roaming profile which will be used during the Terminal Session.


Just for your information, you do not necessarily have to specify the Terminal Service profile; it is an optional thing to do. You can just leave the default profile path (which is C:\Users) and create a specific folder redirection. In this case, the profile will be residing in the default location, but the main folders (you choose which) are redirected wherever you want.

You can find more explanation about setting Terminal Servies Profile path here.

b) Folder Redirection. In the Terminal GPO you can specify Folder Redirection which will take place only during the Terminal Session. For example you want all users to have a predefined set of Programs in their Start Menu during the Terminal Session; this can be achieved by redirecting the Start Menu folder. You can find details about the Folder Redirection in this article.

As we are making folder redirection under the User Configuration, some of you may think that it is not going to work because the Terminal Services GPO is linked to OU containing the Computer Object, but do not forget that we have enabled Loopback Processing of Group Policy, which allows us to replace the User Configuration for the users logged in to the Terminal Services server.


That is it, you have done the main things and your Terminal Services Server should be up and running. Now you may want to implement Remote Apps or TS Web Access, I will try to speak about this in the future.

Thanks for reading, I hope it helped you. And please let me knoe if you think that I missed something :-)

If you liked the post, please feel free to click on a few Ads on this page ;-)

Thursday, 7 January 2010

XP mode on Windows 7 Home Premium.

Those of you who started using Windows 7, have probably noticed that sometimes you cannot run some application which you could run in Windows XP or Vista. If you are lucky enough to have Windows 7 Professional or Windows 7 Ultimate, you can download such as called “XP mode” and run those applications in XP mode, this resolves all compatibility issues (you can download the XP mode here).

But those of you who have Windows 7 Home Premium are not eligible for XP mode, you just cannot install it on your PC as it is not supported by your version of Windows 7. But hey, do not be blue; there is a solution for you. The solution is called Virtual PC 2007, yes so simple. Although on the official Virtual PC 2007 web page you will see that it is not supported by Windows 7. Let me assure you, it works perfectly. I have been testing it for the last two months with lots of different applications, and I had no crashes at all. Of course if you have some very very important work and you want to use Windows 7 Home Premium with Virtual PC 2007, I would not recommend you to do this, but if you are a home user and you want to run some old game, feel free to use it.

You can download Virtual PC 2007 here.

3